
Development Maven Java
I don’t know where you stand on the raging war between Gradle and Maven for build tool of choice for Java developers but one thing that keeps me using Maven is that it has core functionality for archetypes.
An archetype is a templated project that has configurable options available for a user of the archetype. When you use an archetype, you plug in the options made available to you and a few moments later, a project based on that archetype and your parameters has been generated for you.
This has great advantages in an entity based API delivery - where you’re interacting with a single entity (e.g. products or customers) per service. Typically for these services, you’re exposing CRUD operations with small amounts of business logic and they contain a lot of boilerplate code.
Imagine that, with a single command, all of your boilerplate code is taken care of and that you just need to focus on adding fields to your entity and business logic - lovely!
How to Archetype
Generation
Here, I’ll show you some of the archetype features I’ve used and provide a sample archetype for you to go through and/or use.
The easiest way to get going, is to create a project exactly as you normally would. When you’re done, navigate to the project’s base directory and enter the following in a terminal:
| |
This will create an archetype from your current project. This archetype will be found in /target/generated-sources/archetype. I would advise taking a copy of this directory to work on in another part of your filesystem.
Take a brief moment to look at the pom.xml in the archetype project root directory. Edit as you like.
Now that we have the base archetype, it’s time to start adding parameters to it. These parameters will be used to replace parts of your code and filenames with user-specified values, when they use your archetype.
Adding Parameters
First we need to define what parameters should be made available. This is done in the src/main/resources/META-INF/maven/archetype-metadata.xml file.
There are some properties made available to us without any configuration but any custom properties should be defined in a <requiredProperties></requiredProperties> block like so:
| |
I’d keep this file open, as you’ll likely be dipping into and out of it whilst configuring and testing your parameters.
Whilst you have nothing else open though, now might be a good time to ensure any unnecessary directories and/or files are removed from the <fileSets></fileSets> section as everything listed here will be part of every application generated from your archetype.
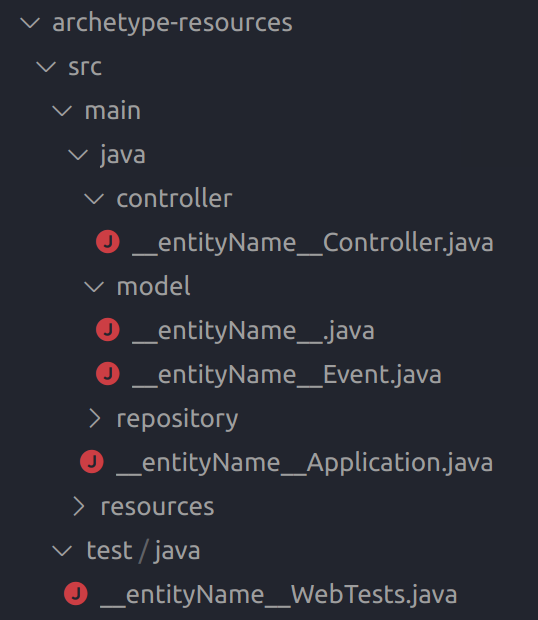
Now that we know where to edit properties and file sets, we can navigate through our code, found in src/main/resources/archetype-resources and start replacing some stuff with property placeholders.
Using Parameters
An example of an out-the-box property is the package property, you will see that Maven has been nice enough to replace all of your package statements with something that looks like this: package ${package};, or package ${package}.repository; etc., depending upon which Java file you open.
Every time you try to generate a project from an archetype, you will be asked by Maven for the base package name. Maven will replace every instance of ${package} across your codebase with your input value.
The user of our archetype will also be asked for values to assign to the required properties we recently defined too. We can use the same (${value}) syntax to indicate where these values should be used across our codebase:
| |
You may have noticed that in the earlier requiredProperties example, we defined a few properties that had a default value of true, hinting that they might be used in a boolean expression - good catch:
| |
This says that if the includeRead property is set to true, include this section of code. Otherwise, don’t include this code block.
You can use Maven properties in file names __likeThis__:
Post-Generation Script
Finally, you can also provide Maven a groovy script (src/main/resources/META-INF/archetype-post-generate.groovy - it has to have this filename and be in this exact location) to run any custom commands after a project has been created from your archetype.
The benefit of this groovy script is that it has access to all of the properties used to generate a project, so you can do some file clean-up or some extra work based upon certain property values:
| |
Local Installation
Now that you’ve developed your archetype, I’m sure that you’ll want to actually use it. From the root directory of your archetype project, run:
| |
We can start using it now!
To use your archetype we navigate to where we’d like to generate a new project and then enter the following into a terminal:
| |
Where the values for the parameters match those defined in your archetype’s pom.xml - This will allow you to generate a new project in “Interactive Mode”, meaning that you’ll be asked for values for each required property one-by-one.
You can use the same syntax "-DentityName=Dave" to define your properties ahead of this step. For example:
| |
Maven will give you the opportunity to change your mind on any or the properties before generating your new project.
Voila!
There you have it. Hopefully you can see the power and potential use-cases for Maven archetypes.
If this blog post is a little difficult to follow, do let me know. You can also check out the archetype I created alongside writing this post for extra context.